Ever opened a Word document and noticed weird spacing that just won’t go away? Non-printing characters in Word are probably the hidden culprit, and the fix takes less than 30 seconds.
These invisible marks — spaces, tabs, paragraph breaks — control your document’s structure behind the scenes. They never show up on print, but they can wreck your formatting if you don’t know they’re there.
In this guide, you’ll learn exactly how to turn them on, turn them off, and use them to fix annoying spacing issues in Word on Windows, Mac, and Word Online.
📋 Table of Contents
- What Are Non-Printing Characters in Word?
- How to Show Non-Printing Characters in Word (Windows)
- How to Show Non-Printing Characters in Word (Mac)
- How to Show Non-Printing Characters in Word Online
- Common Non-Printing Characters and What They Mean
- How to Hide Non-Printing Characters Again
- Comparison: Show/Hide Methods Across Platforms
- Why Can’t I See Spaces in Word? (Troubleshooting)
- FAQs
- Conclusion
🎯 What Are Non-Printing Characters in Word?
Non-printing characters, also called formatting marks, are symbols that show you the hidden structure of your document. They include spaces, tabs, paragraph marks, and page breaks.
They’re called “non-printing” because they never appear when you actually print the page or save it as a PDF. They only show up on your screen while you’re editing.
💡 Pro Tip: Editors and proofreaders keep these marks on permanently. It helps catch double spaces and stray tabs before they cause formatting headaches.
Here’s the thing — most formatting problems in Word (uneven spacing, weird line breaks, misaligned text) happen because of these hidden characters. Turning them on is the fastest way to diagnose the issue.
💻 How to Show Non-Printing Characters in Word (Windows)
Showing non-printing characters in Word on Windows only takes one click. Here’s how:
- Open your Word document and go to the Home tab.
- Look in the Paragraph group for the pilcrow icon (¶).
- Click it once. All formatting marks will appear instantly.
Prefer keyboard shortcuts? Just press Ctrl+Shift+8. It toggles the same feature without touching your mouse.
⚙️ Set Formatting Marks to Always Show
If you want certain marks visible all the time, regardless of the toggle button, do this:
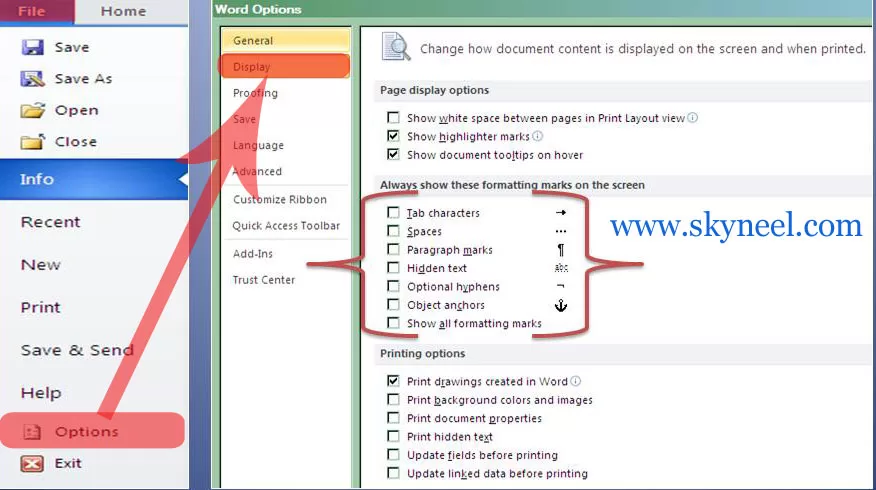
- Go to File > Options > Display.
- Under “Always show these formatting marks on the screen,” check the marks you want (spaces, tabs, paragraph marks, etc.).
- Click OK to save.
🍎 How to Show Non-Printing Characters in Word (Mac)
The process on Mac is nearly identical, just with a different shortcut.
- Open the document and click the Home tab.
- Click the pilcrow (¶) icon in the Paragraph section.
- Or press ⌘+8 to toggle it instantly.
To customize which marks always show, go to Word > Preferences > View, then check the boxes under “Show Non-Printing Characters.”
📌 Important: Mac and Windows shortcuts are different. Don’t try Ctrl+Shift+8 on a Mac — it won’t work the same way.
📱 How to Show Non-Printing Characters in Word Online
Working in a browser? Word Online handles this a bit differently since there’s no Ribbon icon by default.
- Click the More Options icon (three dots) in the top-right corner and select Show/Hide.
- Or right-click anywhere in the document and choose Show/Hide.
- Or simply type “formatting marks” in the search box and select the option from results.
Word Online is lighter on features, but this basic toggle works reliably across desktop and mobile browsers.
🔍 Common Non-Printing Characters and What They Mean
Once you turn on formatting marks, you’ll see several symbols. Here’s what each one actually means:
- Dot (·): A single space between words.
- Pilcrow (¶): End of a paragraph.
- Arrow (→): A tab character.
- Bent arrow (↵): A manual line break, not a new paragraph.
- Dotted box: An anchor for a floating image or object.
Understanding these symbols helps you fix spacing issues fast, instead of guessing what’s wrong.
❌ How to Hide Non-Printing Characters Again
Once you’re done editing, you’ll probably want a cleaner view. Hiding them is just as easy:
- Windows: Click the pilcrow icon again, or press Ctrl+Shift+8.
- Mac: Click the pilcrow icon, or press ⌘+8.
- Word Online: Repeat the same Show/Hide steps from the menu.
However, any marks you set to “always show” in Options will stay visible even after you hide the rest.
📊 Comparison: Show/Hide Methods Across Platforms
| Platform | Shortcut | Ribbon Location | Customizable Marks |
|---|---|---|---|
| Windows | Ctrl+Shift+8 | Home > Paragraph | Yes (File > Options > Display) |
| Mac | ⌘+8 | Home > Paragraph | Yes (Word > Preferences > View) |
| Word Online | None (menu only) | More Options (⋮) | No |
🤔 Why Can’t I See Spaces in Word? (Troubleshooting)
Sometimes formatting marks are on, but you still can’t see spaces properly. Usually, it’s one of these reasons:
- You’re in Print Layout view instead of Draft view, where marks display differently.
- Individual marks are unchecked in the Display or Preferences settings.
- A font rendering issue is hiding the dot symbol on your screen.
- Compatibility Mode is active: Older .doc files opened in Compatibility Mode sometimes render formatting marks inconsistently. Save the file as .docx to fix this.
- Zoom level is too low: At very small zoom percentages, dots and small marks can become nearly invisible. Try zooming to at least 100%.
For example, if you’ve just copied text from a PDF or a webpage, Word sometimes applies hidden formatting that doesn’t behave like normal typed text. Turning on formatting marks right after pasting content helps you spot these issues instantly, before they turn into a bigger cleanup job later.
Switching to Draft view under the View tab usually resolves this instantly.
✅ Key Takeaway: If Show/Hide is on but nothing looks different, check your view mode before assuming something is broken.
⚠️ Common Mistakes to Avoid
Turning on formatting marks is easy, but a few small mistakes can cause confusion later. Here’s what to watch out for.
- Forgetting to hide marks before printing: Marks never print, but a cluttered screen can make you miss actual formatting errors.
- Confusing spaces with non-breaking spaces: A non-breaking space looks different (a small circle) and behaves differently during line breaks.
- Deleting pilcrows carelessly: Removing a paragraph mark merges two paragraphs together, which can mess up spacing and styles instantly.
- Ignoring Draft view issues: Some marks display differently in Print Layout versus Draft view, so don’t assume something’s broken right away.
- Turning on every mark at once: Showing all formatting marks together can overwhelm your screen. Enable only what you actually need.
⚠️ Warning: Never delete a pilcrow (¶) just to “clean up” spacing. It can silently merge paragraph formatting and break your document’s structure.
Honestly, most Word formatting issues trace back to one of these five mistakes. Avoiding them saves you a ton of troubleshooting time later.
❓ Frequently Asked Questions
1. What is the shortcut to show non-printing characters in Word?
On Windows, it’s Ctrl+Shift+8. On Mac, it’s ⌘+8. Both instantly toggle formatting marks on or off.
👉 Don't miss: How to unlock bootloader HTC Desire 825
🔥 Trending: Reliance Jio is giving free caller tune service for all Jio users
2. Do non-printing characters affect printing?
No. These marks are strictly on-screen helpers. They never appear on printed pages or exported PDFs.
3. Why do I see dots between my words in Word?
Those dots represent single spaces. They appear because formatting marks display is turned on in your document.
4. Can I show only specific formatting marks, not all of them?
Yes. Go to File > Options > Display (Windows) or Word > Preferences > View (Mac) and select only the marks you need.
5. Does Word Online support formatting marks?
Yes, but it’s limited. You can toggle Show/Hide from the menu, though customization options aren’t available like on desktop.
🚀 Conclusion
Non-printing characters might be invisible, but they’re the reason your Word documents look the way they do. Once you know how to show or hide non-printing characters in Word, fixing spacing issues becomes a two-second job instead of a guessing game.
Quick tip: Keep these marks on while editing important documents, then hide them before sharing or printing for a clean, professional look.
Found this guide helpful? Bookmark Skyneel.com and check out our other Word formatting tutorials to keep your documents error-free every time. 👇